Connect with us
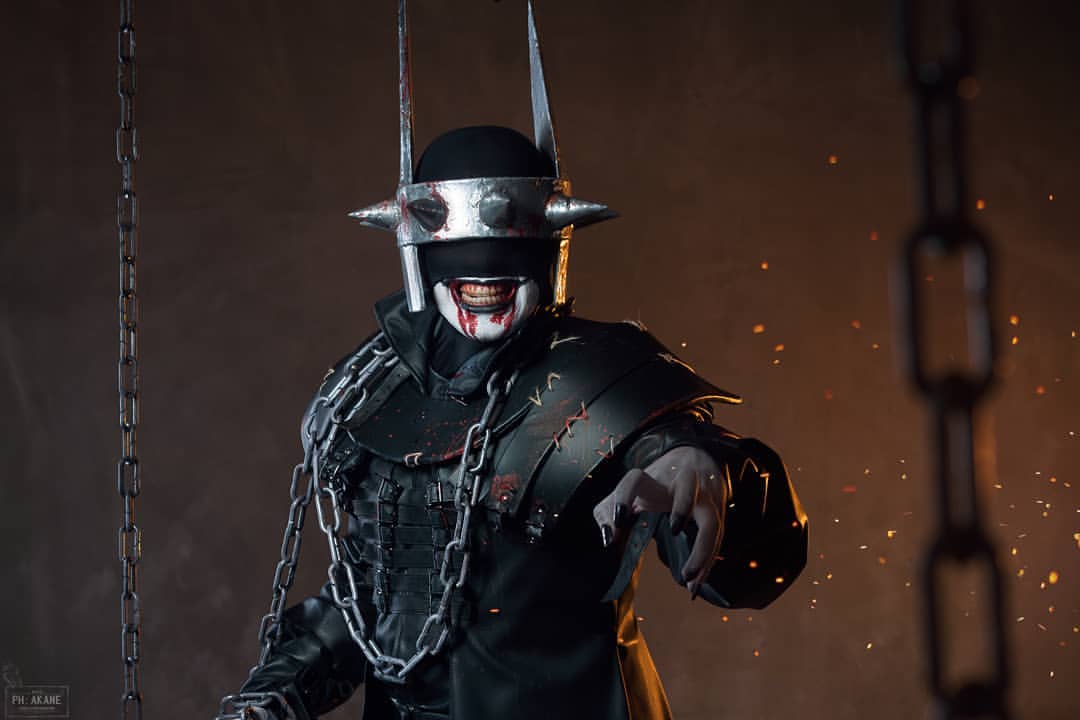
Cosplayer Whitenerdy brings the terrifying Batman Who Laughs to life

Cosplay

Cosplayer Whitenerdy brings the terrifying Batman Who Laughs to life

“You see… a Batman who laughs… is a Batman who always wins.”

The Batman Who Laughs, a character born from Scott Snyder’s epic Dark Nights: Metal saga (we even interviewed him about TBWL at New York Comic Con ’18) is one of the most terrifying comic book creations in recent memory; of course, what would you expect from an amalgam of Batman and his arch-nemesis the Joker?

Somehow, Ukranian cosplayer Whitenerdy found a way to construct this amazing Batman Who Laughs costume without having several heart attacks and for that we’re thankful. Fair warning, though: if we see him in-costume in person, we’re staying very far away. (We’re not taking our chances with that Evil Robin either.)


View this post on Instagram

The Batman Who Laughs: shoes tutorial. P.s. english version is in the comments. Взуття для мого The Batman Who Laughs – саморобне, хоч може і не виглядати таким здалеку. Отже, як і обіцяв – представляю вашій увазі покрокову інструкцію по створенню цієї пари взуття. Матеріали та інструменти: взуттєві колодки, резинова підошва, шкірзам, пробійник, клей каучуковий, гранітоль (взуттєвий термопласт), войлок, устілки, степлер промисловий, фен або праска для розігірвання термопласту. 1. Купуємо або робимо правильні колодки (з вашим розміром ноги плюс з бажаною формою взуття, адже саме колодки визначають форму нижньої частини взуття). 2.Робимо лекала взуття. Найлегший спосіб – обгорнути ногу харчовою плівкою чи фольгою і обмотати скотчем. Зверху цієї конструкції намалювати потрібні елементи. 3. Відбиваємо лекала взуття на обраному матеріалі а також дублюємо на підкладному матеріалі. Лекала верхньої чатсини робимо з невеликим допуском, лекала стопи робимо з більшим допуском (адже їх треба буде обгортати навколо колодки і закріпляти). – Зшиваємо з вирізаних шматків (по намічених ще на нозі лініях) те що в майбутньому стане взуттям у одне ціле. 4. З взуттєвого термопласту вирізаємо носки і пятки, і формуємо їх за допомогою фену прямо на колодках. Завдяки цьому взуття буде тримати форму. Також вирізаємо відбиток стопи (підошви) (можна обмалювати устілку або колодку). Кріпимо відбиток підошви до колодки степлером. Продовження у коментарях. #cosplaytutorial #cosplay #thebatman #batman #batmanwholaughs #thebatmanwholaughscosplay #thebatmanwholaughs #joker #jokercosplay #comicconukraine #ukrainiancomiccon #ccu #ccu2018

A post shared by DIO (@whitenerdy) on

View this post on Instagram

Hello everyone! Tutorial for the crown of the Batman Who Laughs is here! First photo by @miadema.cosplay.ph Others by me. Укр версія у коментах. Materials: 5 and 10 mm EVA foam, bubblestar(worbla), hot glue, acrylic primer, acrylic spray paint, acrylic artistic paints. Tools: heat gun, hot glue gun, paper cutter knife, dremel tool, pliers, wooden cylinder (size of a desired spike). 1. So it all started with a basic template made with 5 5 mm EVA. I have drawn and cuby hand t two blades and a simple cylinder. I have assembled it with tape to see the basic look and fixfix sshapape a andnd size where needede where needd. 2. Next step was to disassemble basic crown and use thehe partparts ass templatess. New blades are mamade ofof 10 mm EVA. New cNew cylinder was cut clean from 5 5 mm foafoa. I have cut the edges of the blades to be "sharp" and also carvedarved the horizontal lines to later glue cylinder in thoseose placess. Smoothed the edges with dremel tool and glued it all together. 32. . At this point I had to wrap the EVA crown with thermoplastic (bubblestar). Used a heat gun to help me with that. Bonus video of smoothing the edges at the end of the carousel. 4. Spikes. It was the most time consuming step. A wooden cone with a nail inside was used as a base for all of the cylinders. I've been wrapping bubblestar around a cone adding foil between the cone and plastic because otherwise it sticks. And believe me you don't want it to be stuck. It's a pain in the neck to unstuck it. So: take the cone by the nail with pliers, heat the plastic, wrap it and wait for it to cool. Also, i've cut cones from 3 mm EVAfoam to insert into each plastic cone. Since to attach a cone to the crown it needs to be heated and it loses the shape without an inner EVA cone. 5. One by one I have attached the spikes to the crown. Basically, i was fusing them together. Also, I have created some damage to the crown (scratches, bumps, imitation of metal fusion etc). 6. I've covered the crown with multiple layers of primer and metallic spray paint. 7. Weathering. I've created a palette of different colors: rust, blood, etc. And used it to create the illusion that it was used a lot. The end.

A post shared by DIO (@whitenerdy) on

Instagram: @whitenerdy


Join the AIPT Patreon

Want to take our relationship to the next level? Become a patron today to gain access to exclusive perks, such as:

  • ❌ Remove all ads on the website
  • 💬 Join our Discord community, where we chat about the latest news and releases from everything we cover on AIPT
  • 📗 Access to our monthly book club
  • 📦 Get a physical trade paperback shipped to you every month
  • 💥 And more!
Sign up today
Comments

In Case You Missed It

Marvel Preview: Spider-Woman #6 Marvel Preview: Spider-Woman #6

Marvel Preview: Spider-Woman #6

Comic Books

New ‘Phoenix’ #1 X-Men series to launch with creators Stephanie Phillips and Alessandro Miracolo New ‘Phoenix’ #1 X-Men series to launch with creators Stephanie Phillips and Alessandro Miracolo

New ‘Phoenix’ #1 X-Men series to launch with creators Stephanie Phillips and Alessandro Miracolo

Comic Books

Marvel reveals details for new X-Men series 'NYX' #1 Marvel reveals details for new X-Men series 'NYX' #1

Marvel reveals details for new X-Men series ‘NYX’ #1

Comic Books

Marvel sheds light on Jed MacKay and Ryan Stegman's 'X-Men' #1 Marvel sheds light on Jed MacKay and Ryan Stegman's 'X-Men' #1

Marvel sheds light on Jed MacKay and Ryan Stegman’s ‘X-Men’ #1

Comic Books

Connect
Newsletter Signup